How to delete a page in word, Step by step
Plain and simple, a blank page that appears for no reason in the middle of a document is a mistake, and can make you look unprofessional . However, it is something that can happen with some frequency when using Microsoft Word , so you should review your documents well. And if you find a nosy page that has nothing to do there, you can rest assured, because here you have the solution. Learn how to erase a page in Word without too much stress.
Step 1: select the page you want to delete
The first step in removing a page is to make sure it is selected. Scroll to the page in question or use the Go To function ( Ctrl + G. Or CMD + G if you’re using a Mac).
When you’ve located the page, click or tap anywhere to select it.
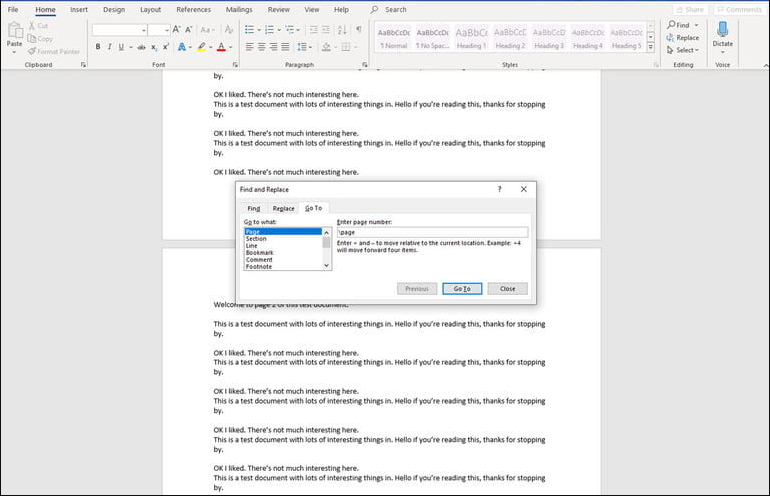
Step 2: select the entire page
It may appear that you have already done this step, but this part is necessary so that Word knows that you want to delete the entire page, not just part of the content it contains. Open the Go to function ( Ctrl + G or CMD + G if you’re using a Mac) and type page in the Enter page number box . Then select Go to , followed by Close.
Step 3: delete the page
Microsoft Word doesn’t have a dedicated page removal tool, but now that we’ve selected the entire page, we can remove it very easily. Verify that you have selected the entire page that you want to delete and then press the Delete key .
How to delete a blank page in Word
Most text editors, including Word, have a habit of creating blank pages at the end of your document, and seemingly for no reason. Deleting them before sending the document to your boss or printing it may be a good idea. To make the process as quick as possible, there are a couple of quick methods you can use.
Step 1 : to find the blank pages, we will open the Navigation Panel. You can do this by selecting View from the top menu and then making sure the Navigation Pane box is checked. This should open a new column on the left side that shows all the pages in your document. If not, be sure to select the Pages tab in it.
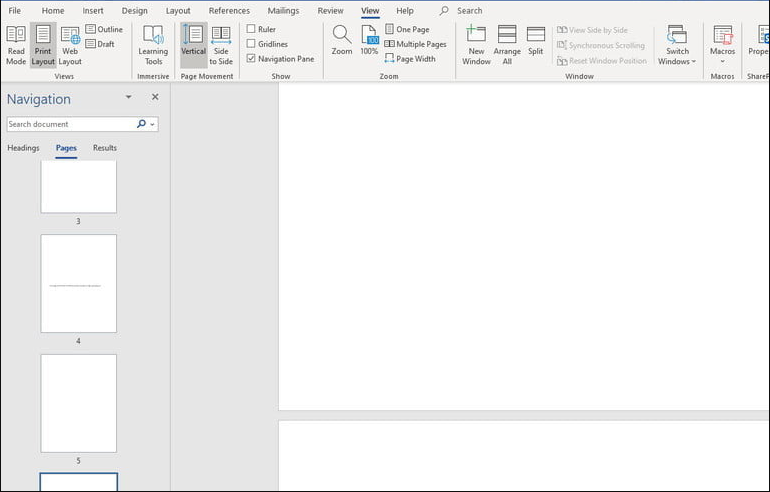
Step 2 : Scroll through the list to find the blank pages you want to remove. Select it and double-click or tap to go directly to it.
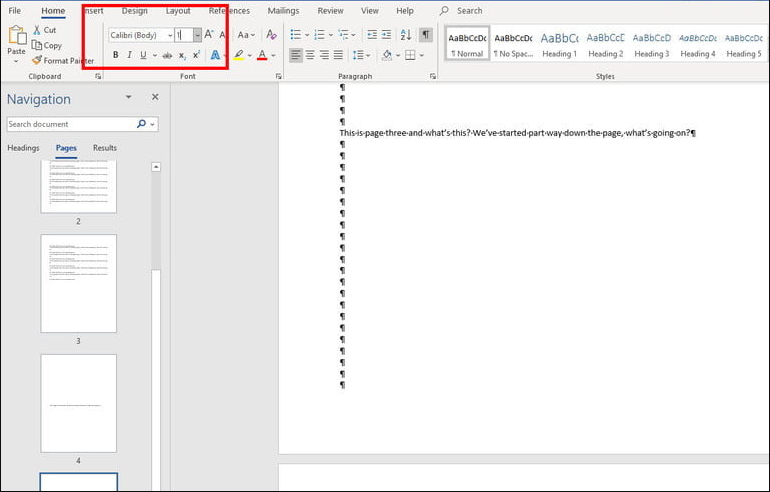
Step 3 : Press Ctrl + Shift + 8 (or if you’re using a Mac, CMD + 8 ) to display the paragraph markers that created the blank page in the first place.
Step 4 : Click and drag to select all the paragraph marks and hit the Delete key to delete them as well as the blank page. Alternatively, if you only have a few paragraph marks and want to move them to the last page, you can select all of them and change the font size by going back to the Home tab on the top bar and typing ” 1 ” in the font size box, then press Enter.
FAQ
Where is Edit document in Word? Click Edit Document Word for the Web edit in # a0 to make changes to a document . When you open a document from OneDrive, Word for the web displays it in reading view.
How to remove a section break in Word? Delete a section break
- If it is not shown, select home> show / hide. to show section breaks . The section breaks look like this: …
- Position the cursor just before the section break and press delete.
How do I go about numbering the pages in Word?
On the Insert tab, click the icon Number of page and then number page . Select a location, and then choose an alignment style. Word will automatically number all pages except designated title pages .
How to modify a PDF file to Word?
Edit a PDF file
- Go to File> Open.
- Find the PDF file and open it (you may need to select Browse and find the PDF file in a folder).
- Word prompts you to make a copy of the PDF file and converts its contents into a format that Word can display. The original PDF file will not be modified at all.
How to make a paragraph format in Word?
Format / Paragraph menu
- Open the Format menu .
- Select the Paragraph option to display the dialog box.
- In the Alignment box, expand the list and select an alignment type.
- Press the OK button in the dialog box.
How to edit a read-only Word file?
Restrict editing
- Click Review> Restrict Editing.
- Under Editing restrictions, select Allow only this type of editing in the document and make sure the list says No changes ( Read only ).
- Click Yes, start applying protection.
- In the box that appears, type a password that you can remember, and then type the password again to confirm it. The password is optional. But if you don’t add a password, anyone can click Stop Protection and edit the document.
How to remove the lines that appear in Word?
You can edit the color or style of the separator by selecting options on the Home tab , or to remove separators, click separator notes to the foot in the list notes the foot and then select and delete the line of separation.
How to see page breaks in Word?
- Click start> show / hide. This option will display non – printable characters (paragraph markers, jumping section, page breaks , etc.) …
- Double-click the page break so that it is selected, and then press the Delete key.
How to make a header on a single page?
Change or delete a header or footer page on a single page
- Double – click area header or footer page of the first page .
- Check the Different First Page check box to see if it is selected. …
- I add new content to the header or footer page .
- Click Close Header and Footer or press Esc to exit.
How to put a border to a text in Word?
Add a border to selected text
- Select a word, line, or paragraph .
- On the Home tab, click the arrow next to the Borders button.
- In the border gallery, click the border style that you want to apply.
How to put a double line border in Word?
- Select the paragraph you want to change the width of the border .
- On the Page Layout tab, click Page Border in the Page Background group.
- Click the Borders tab .
- On the Borders tab , select the desired border width from the Width list.
- Click OK.
How to put a watermark on a text?
Insert a watermark
- On the Design tab, select Watermark .
- In the Insert Watermark dialog box , select Text and type your own watermark text or select one, such as DRAFT, from the list.
- Select OK.